
Adding a Favicon to Your Website
Okay, let me jump straight to the point: If your website does not include a branded favicon, then, it’s an immediate giveaway that it was a do-it-yourself (DIY) project. And you’re thinking to yourself at this moment, “What is a favicon?”
In this latest Squarespace Snackables tutorial, I’ll answer that question, why it matters, and how to add it to your website.
What is a favicon?
Let’s start with understanding what a favicon is. When you open a web browser on a desktop, you will find the business website logo just to the left of the company title, as in the screenshot below.

It’s a subtle detail that most web users take for granted because it’s so prevalent as a best practice that most of us hardly take notice of. When the favicon appears as a grey 3D box, though, the website is using the out-of-box standard image which means it was likely overlooked in the design process!
Brand over Bland
This bland box signifies one of two things: Either it was missed by the website designer, or it was a DIY website created by the business owner. Ouch!
Don’t get me wrong – as business owners, we must all work within the financial reality of what is best for the business at that given moment. The box, though, gives it away, and I always have an urge to reach out to the owner to say, “There’s a quick and easy way to fix that image problem.” And it is an image problem, and I mean that both from a logo but also from a company reputation perspective.
Let’s step it up a notch and implement this easy fix for your Squarespace website.
1. Log in to Your Squarespace Account
Head to account.squarespace.com and sign into the website you want to update.
2. Open the Design Settings
From your dashboard, click on the 3 dots and choose “Settings” on the right side.

3. Choose the ‘Favicon’ option.
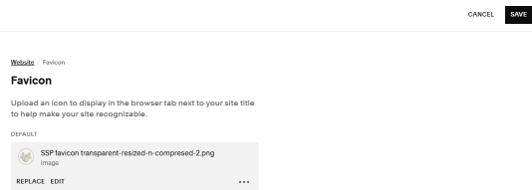
Inside the Settings window, click “Favicon”. This is where you’ll upload your favicon image.

4. Upload Your Favicon File
Click “Add a Favicon” or the image thumbnail (if replacing an old one). Next, you’ll want to choose your logo using the specifications below. Adhere to them because:
Anything more and Squarespace won’t allow the image to be uploaded.
Anything less and the logo will appear to be poor quality.
Choose an image file from your computer.
✔️ Recommended favicon specs:
File type: .png or .jpg.
Image Size: 100×100 pixels or 300x300 pixels (square)
File Size: 0.1 mbps maximum (100 kbps).
Keep the design simple and recognizable even at a small size.
5. Save Your Changes
Once your icon is uploaded, click “Save” at the top right of the screen. Squarespace automatically applies the favicon sitewide to all tabs, bookmarks, and social previews.
6. Preview & Test Your Favicon
Open your website in a browser and check the tab to see your favicon.
If it doesn't show up right away, try refreshing the page or clearing your cache. Personally, “cache” is too technical for me. Instead, if you are regular Google Chrome user, then, try a different web browser, like Bing, to verify the change took place and your new favicon appears in the browser tab.
And that’s it, mi amigo! You’ve upscaled to a subtle yet professional change that tells the world you are open for business. Just don’t ask me how to pronounce “favicon” – everyone has their own take on it.
If this tutorial is helpful, please do me a big favor: Subscribe to my newsletter. You can also leave a comment on my YouTube channel.
Hasta la próxima!
